ZNC Compiler
A downloadable compiler
ZNC - A native compiler for the ZX Spectrum Next
ZNC is a language and compiler for the ZX Spectrum Next. The language is closely modeled after the C programming language, but does deviate in some cases where it either made the language easier to parse or in other cases where I preferred an alternate syntax.
The compiler is a non-optimizing single pass compiler, while the generated code is not the fastest or the smallest it should outperform non-compiled languages.
In this language:
Build Directives. A program may start with optional build directives:
- The
makedirective configures the build mode (with options "dot", "nex", or "raw") and optionally a string specifying the name an location of the resulting binary. - The org directive sets the origin (memory address) of the code.
Top‐Level Items. Programs are a sequence of top‑level items (declarations and/or statements). Unlike traditional C, top‑level statements are allowed. However, if a top‑level statement calls a function, the function must have been declared before its use—either via a full definition or via a prototype.
Declarations. There are variable declarations, function definitions, and function prototypes. Variable types include scalar types (char, byte, int), arrays (e.g. int[10]), and pointers (e.g. int*).
Control Structures. You’ll find the usual control constructs: if–else, while, and for loops, as well as statements such as break, continue, and return.
Inline Assembly. A special asm block can be used to embed raw Z80N assembly code inside functions.
I/O Primitives. For basic output, built‑in functions putc() and puts() are provided.
Banks. A bank construct allows you to group a statement block into a memory bank
Installing the tools
The compiler includes a suite of tools:
- ZED - A text editor
- ZNC - The compiler
- ZOPT - A peephole optimizer
- ASM - Assembler
- ZIDE - Front-end driver
Start by copying the downloaded zip file to the root directory of your NextZXOS SD Card. Then, from the NextZXOS command line, enter:
.unzip -o znc.zip
Once the extraction is complete, four binary components will be installed as DOT commands, and a new ZDEV directory will appear in the root. Navigate to this directory, where you will find a collection of sample programs.
To see how the samples are compiled, optimized, and assembled, open zncdemo.bas and run it. A menu will be displayed, allowing you to select a sample to execute. As each step unfolds on the screen, you will get a clear understanding of the process involved in compiling your own applications.
Compiling code
Compilation is a two stage process.
- Compile the source code to assembly language
The following will compile a source file called demo.znc to a corresponding assembly file called demo.asm.
.znc demo.znc
- Assemble the file to the executable binary
Using the NextBASIC Inline Assembler, you assemble the generated assembly file to a binary.
.asm demo.asm
Now you should have file called demo in the DOT directory on your SD Card. This DOT command can be tested by executing the following at the command line.
.demo
Examples
Hello world
Create a file called hello.znc and add the following content
make dot "/dot/hello";
puts("Hello World");
Next, compile and assemble the code
.znc hello.znc
.asm hello.asm
If you did not get any errors with the above, you can excute the program and you should see Hello World printed to the screen.
Bouncing ball
This is a more complex example that bounces a character on the screen.
make dot "/dot/ball";
void gotoxy(byte x, byte y) {
  putc(22);putc(y);putc(x);
}
int x=15, y=10;
int dx=1, dy=1;
byte n = 0;
while (1) {
  __asm__ {
    halt
    ld a, (_n)
    out ($fe), a
  }

  gotoxy(x, y);
  putc(' ');
  x = x + dx;
  y = y + dy;
  if (x == 0 || x == 31) { dx = -dx; n=(n+1) & 7; }
  if (y == 0 || y == 21) { dy = -dy; n=(n+1) & 7; }
  gotoxy(x, y);
  putc('*');
}
Using ZIDE
As an alternative to using the command line, you can use ZIDE which provides a more user friendly development environment. ZIDE is a NextBASIC program that can be executed from the Browser or from the command line using the following commands.
load "zide.bas"
run
Once the IDE is launched, you can use the highlighted hotkeys to set the various options and execute commands.
Options:
W - Sets the working file, this is file that will be opened when you launch the editor with E
M - Sets the main file for your project. This is the root file that the compiler will start with
Commands:
E - Edit the current working file
C - Compile the main file, any files included by the main file will also be compiled
R - Run the executable file. The first time you run, you will be prompted to select the executable file
N - Start editing a new file
O - Set compiler options
Q - Exit the IDE
Compiler Options
O from the main screen on the IDE brings you to the Compiler options screen. From this screen you can set the following options
O - Toggle compiler optimization on/off. When off the resulting code is larger and slower, but compile times are much faster
C - Set the command line arguments passed to your application when it is run from the main screen using the run command R
B - Takes you back to the previous screen in the IDE
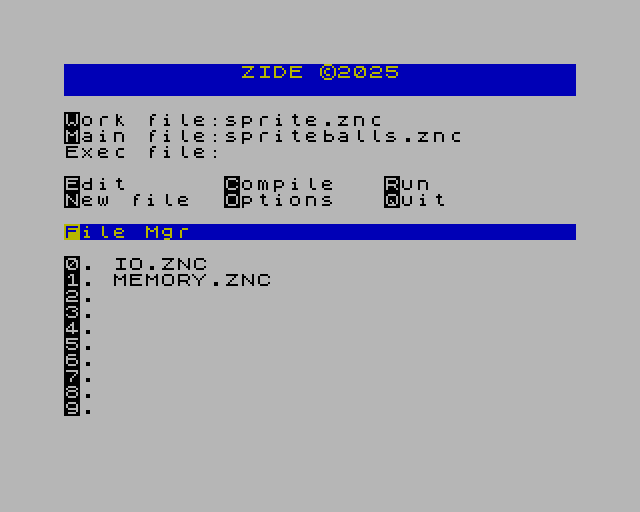
File Manager: The file manager enables you to create shortcuts to files you use frequently, this can be handy in a multi file project.
F - Takes you to the file manager where you can add/remove files from the slots provided.
0..9 - Opens the editor and loads the corresponding file for editing
B - Takes you back to the previous screen in the IDE
ZNC Language Reference
The ZNC language is designed to offer a familiar C-like structure while seamlessly integrating inline Z80N assembly.
Basic Syntax
A typical ZNC source file has two major parts, directives and code
Directives
Directives generally control the code generation process
make
An optional directive placed at the beginning of your source file. This directive configures the specific build options. For example, what type of binary to generate at assembly time and what the binary name should be.
If make is not specified, the compiled code will be assembled directly into memory. This can be useful if you want to compile ZNC code for use as inline code in your NextBASIC applications.
Syntax
make <type> ["<binary name>"];
<type> - Specified the type of binary to create
- dot - Creates a DOT command binary
- nex - Creates a NEX binary
- raw - Raw creates a raw binary with the default code address set to 0xc000 hex or 49152 decimal
["<binary name>"] - Optionally specifies the name of the resulting binary. If not provided, the source file name is used as the base of the binary name.
Example: Create a DOT command named hello in the DOT folder a the root of the current SD card.
make dot "/dot/hello"
org
This directive can occur anywhere in the code, but it is a rather advanced directive. It is used to control the base address used for code generation. If the code is compiled and assembled directly to memory ie. no make option was specified then it also controls the memory address the code will be assembled to.
Syntax
org <address>;
<address> - Specifies the target address for the subsequent code
Example: Target code for address 0x8000
org 0x8000;
bank
The bank directive is used to target code for specific banks. This is useful when compiling NEX or direct to memory binaries. Banks contain blocks of code and data.
Syntax
bank <bankno> '{' <statements> '}'
<bankno> - The bank that the block of code will be compiled and assembled for.
<statements> - The code that will be included in this bank
Example: Compile code for bank 40
bank 40 {
  for(char ch='A'; ch<='Z'; ch=ch+1) {
    putc(ch)
  }
}
Code
The main component of your application is the code, the instructions that the compiler will transform into executable code and data.
Data types
The ZNC compiler supports the following data types
char - Character data type byte - Byte values in the range -128..127 int - Integer values in the range -32768..32767
You can also create pointers to or arrays for each of the data types.
Pointers
Pointers enable to you access data in memory at the address pointed to by the pointer. And integer pointer provides access to a 2 byte integer value at the target address, while a byte pointer accesses a single byte at the address pointed to by the pointer.
The follow will declare a pointer that points to the ZX Spectrum ULA screen memory and writes a byte to the screen.
byte *screen = 0x4000; // ZX Spectrum ULA Screen address (16384 in decimal)
*screen = 255;         // Write the value 255 to the memory address pointed to by "screen"
Pointer arithmetic
TODO
Arrays
You can also create arrays of the base data types. For example if you wanted to store ten integers you could declare an array of integers as follows
int[10] numbers;
Array access and initialization
TODO
Declaring variables
Variables can be declared at any point in the code
Syntax (incomplete)
(* Program directives and top‐level items, where declarations and statements may appear. *)
<program>         ::= [ <make> ]
                      [ <org> ]
                      { <top_level_item> }
<top_level_item>  ::= <decl>
                      | <statement>
<make>            ::= "make" [ "dot" | "nex" | "raw" ] "(" <string> ")" ";"
<org>             ::= "org" <number> ";"
<bank>            ::= "bank" "(" <number> [ "," <number> ] ")" <stmnt_block>
(* Statements *)
<statement>       ::= <stmnt_block>
                      | <decl>
                      | <assignment>
                      | <if>
                      | <switch>
                      | <while>
                      | <for>
                      | <break>
                      | <continue>
                      | <return>
                      | <putc>
                      | <puts>
                      | <asm>
                      | <include>
                      | <expr>
                      | <org>
                      | ";"
<stmnt_block>     ::= "{" { <statement> } "}"
(* Declarations: variable declarations, function definitions, and function prototypes *)
<decl>            ::= <vardecl>
                      | <funcdecl>
                      | <funcproto>
(* Function prototype: note the trailing semicolon instead of a body *)
<funcproto>       ::= <rettype> <ident> "(" <arglist> ")" ";"
(* Assignment expressions. Either a simple identifier or a more complex lvalue/expression on the left-hand side. *)
<assignment>      ::= <lvalue> "=" <expr> ";"
<lvalue>          ::= <ident>
                    | <ident> "[" <expr> "]"
                    | "*" <lvalue>
                    | "&" <lvalue>
(* Control structures *)
<if>              ::= "if" "(" <expr> ")" <statement> [ "else" <statement> ]
<switch>          ::= "switch" "(" <expr> ")" <switch_block>
<switch_block>    ::= "{" { <case_section> } "}"
<case_section>    ::= <case_header> { <statement> }
<case_header>     ::= { "case" <expr> ":" } [ "default" ":" ]
<while>           ::= "while" "(" <expr> ")" <statement>
<for>             ::= "for" "(" [ <decl> | <assignment> ] ";" [ <expr> ] ";" [ <expr> ] ")" <statement>
<break>           ::= "break" ";"
<continue>        ::= "continue" ";"
<return>          ::= "return" [ <expr> ] ";"
<putc>            ::= "putc" "(" <expr> ")" ";"
<puts>            ::= "puts" "(" <expr> ")" ";"
(* Inline assembly block (contents treated as raw Z80N Assembly). *)
<asm>             ::= "__asm__" "{" Z80N_Assembly "}"
<include>         ::= "include" <string>
(* String literal: content details omitted here *)
<string>          ::= "\"" { <character> } "\""
(* Variable declaration: type, identifier, and optional initializer.
   Multiple variables may be declared in one statement. *)
<vardecl>         ::= [const] <type> <ident> [ "=" <expr> ] { "," <ident> [ "=" <expr> ] } ";"
(* Function definition: includes return type, name, parameter list,
   either an assembly block, or a function body. *)
<funcdecl>        ::= <rettype> <ident> "(" <arglist> ")"  <asm> | <stmnt_block>
(* Function call used as an expression; when used as a statement, a semicolon is appended. *)
<call_expr>       ::= <ident> "(" [ <exprlist> ] ")"
<funccall_stmt>   ::= <call_expr> ";"
<rettype>         ::= "void" | <type>
(* Type definitions include scalar types, arrays, and pointers. *)
<type>            ::= <scalartype>
                      | <arraytype>
                      | <pointertype>
<scalartype>      ::= "char" | "byte" | "int"
<arraytype>       ::= <scalartype> "[" <number> "]"
<pointertype>     ::= <scalartype> "*"
<arglist>         ::= <arg> { "," <arg> }
<arg>             ::= <type> <ident>
(* Expressions are parsed using a precedence-climbing algorithm.
   The production below is schematic. *)
<expr>            ::= "(" <expr> ")"
                      | <factor> { <op> <factor> }
<factor>          ::= <number>
                      | <string>
                      | <call_expr>
                      | ( "*" | "&" ) <var> [ "[" <expr> "]" ]
<var>             ::= <ident>
(* Operators available (similar to C, ++/-- can be prefix or postfix) *)
<op>              ::= "+" | "-" | "*" | "/" | "%"
                      | "==" | "!=" | "<" | ">" | "<=" | ">="
                      | "&&" | "||" | "^" | "|" | "&" | "<<" | ">>"
                      | "++" | "--"
(* Identifiers, letters, and digits *)
<ident>           ::= <letter> { <letter> | <digit> | "_" }
<letter>          ::= "A" | "B" | "C" | "D" | "E" | "F" | "G" | "H" | "I" | "J"
                      | "K" | "L" | "M" | "N" | "O" | "P" | "Q" | "R" | "S" | "T"
                      | "U" | "V" | "W" | "X" | "Y" | "Z"
                      | "a" | "b" | "c" | "d" | "e" | "f" | "g" | "h" | "i" | "j"
                      | "k" | "l" | "m" | "n" | "o" | "p" | "q" | "r" | "s" | "t"
                      | "u" | "v" | "w" | "x" | "y" | "z"
<digit>           ::= "0" | "1" | "2" | "3" | "4" | "5" | "6" | "7" | "8" | "9"
<number>          ::= <digit> { <digit> }
<character>       ::= /* any character except the double quote " */

(* The nonterminal Z80N_Assembly is assumed to represent a block of valid Z80N assembly code. *)
Download
Click download now to get access to the following files: